
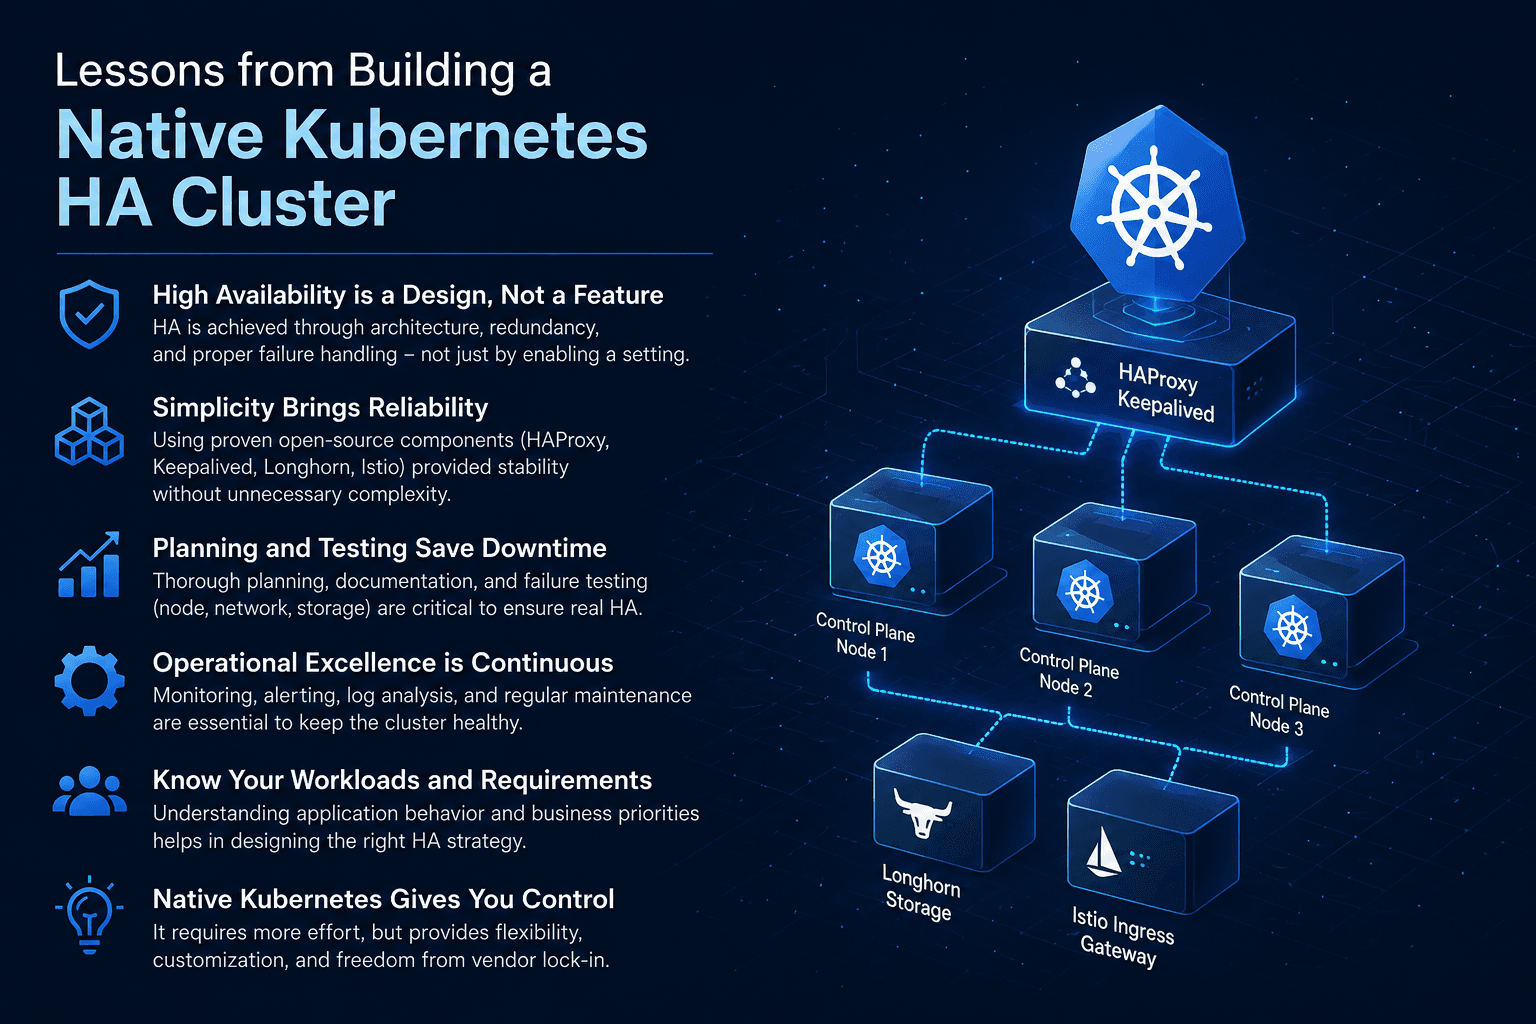
Lessons from Building a Native Kubernetes HA Cluster
Production environment အတွက် Kubernetes HA cluster တစ်ခုကို from scratch တည်ဆောက်တာဟာ simple deployment တစ်ခုထက် အများကြီးပိုပြီး challenging ဖြစ်စေပါတယ်။ Managed Kubernetes service တစ်ခုကိုသုံးရင် platform က အလုပ်တချို့ကို သက်သာစေပေမယ့်၊ on-premises environment မှာတော့ network, load balancing, control plane, storage, monitoring အားလုံးကို ကိုယ်တိုင် design လုပ်ရပါတယ်။ ဒါကတော့ ကျွန်တော်တို့ အနေနဲ့ Kubernetes HA cluster ကို HAProxy, Istio Ingress Gateway, and Longhorn storage နဲ့ production-ready အဖြစ် တည်ဆောက်ခဲ့တုန်းက အကြောင်းအရာကို ပြန်လည် Sharing လုပ်ခြင်းဖြစ်ပါတယ်။ အပြင်ပန်းမှာတော့ components တွေက open-source ဖြစ်လို့ ရိုးရှင်းသလို ထင်ရပေမယ့်၊ တကယ်တမ်းမှာတော့ component တစ်ခုချင်းစီရဲ့ behavior ကို နက်နက်ရှိုင်းရှိုင်းနားလည်မှသာ stable ဖြစ်တဲ့ cluster တစ်ခုကို ရနိုင်ပါတယ်။
Why We Didn't Choose a Managed Kubernetes Service
ဒီ project ကို စတင် design လုပ်စဉ်ကာလတုန်းက Enterprise Kubernetes အနေနဲ့ရှိနေတဲ့ RedHat OpenShift ရော Managed Kubernetes services ဖြစ်တဲ့ Amazon EKS တို့ကိုလည်း ထည့်သွင်းစဉ်းစားခဲ့ပါတယ်။ Managed services တွေက control plane management, automated upgrades, built-in high availability, နဲ့ operational overhead လျော့နည်းခြင်း စတဲ့ အားသာချက်များစွာ ရှိပါတယ်။ သို့သော် ဒီ project ရဲ့ customer requirements က Managed Kubernetes platform ကို ရွေးချယ်ခြင်းက အသင့်တော်ဆုံး option မဖြစ်ခဲ့ပါဘူး။
ပထမဦးစွာ customer environment ဟာ on-premises infrastructure ပေါ်မှာ အခြေခံထားပြီး၊ data sovereignty နဲ့ regulatory compliance requirements တွေကြောင့် workloads အချို့ကို public cloud ပေါ်သို့ ပြောင်းရွှေ့ရန် ကန့်သတ်ချက်များ ရှိနေခဲ့ပါတယ်။ အထူးသဖြင့် financial sector workloads ဖြစ်တာကြောင့် infrastructure control နှင့် data location ကို အပြည့်အဝ ထိန်းချုပ်နိုင်ခြင်းသည် အရေးကြီးသော requirement တစ်ခုဖြစ်ခဲ့ပါသည်။
ဒုတိယအနေဖြင့် cost optimization သည် အရေးကြီးသော factor တစ်ခု ဖြစ်ခဲ့ပါသည်။ Managed Kubernetes services များသည် operational complexity ကို လျော့ချပေးနိုင်သော်လည်း cluster management fees, data transfer charges, storage costs, နှင့် additional cloud services များကြောင့် ရေရှည် operating cost များ မြင့်တက်လာနိုင်ပါသည်။ Customer ရဲ့ budget planning အရ existing infrastructure resources များကို အမြင့်ဆုံး အသုံးချနိုင်မည့် open-source based architecture ကို ပိုမိုနှစ်သက်ခဲ့ပါသည်။
နောက်ထပ်အချက်တစ်ခုမှာ infrastructure flexibility ဖြစ်ပါသည်။ Native Kubernetes platform ကို ကိုယ်တိုင်တည်ဆောက်ခြင်းအားဖြင့် networking, ingress, storage, security policies, နှင့် cluster lifecycle management များကို customer requirements အတိုင်း စိတ်ကြိုက် customize ပြုလုပ်နိုင်ခဲ့ပါသည်။ Vendor-specific limitations များကို စဉ်းစားရန် မလိုအပ်သလို vendor lock-in risk ကိုလည်း လျှော့ချနိုင်ခဲ့ပါသည်။
ဒီအကြောင်းအရင်းများကြောင့် Managed Kubernetes platform တစ်ခုကို အသုံးပြုခြင်းထက် HAProxy, Istio Ingress Gateway, Longhorn Storage နှင့် Kubernetes open-source ecosystem ကို အခြေခံသည့် Native Kubernetes HA architecture ကို ရွေးချယ်ခဲ့ခြင်းဖြစ်ပါသည်။ ဒီ project မှာ operational responsibility များ ပိုမိုများပြားလာသော်လည်း customer requirements, budget constraints နှင့် long-term infrastructure strategy များနှင့် ပိုမိုကိုက်ညီသည့် solution တစ်ခုကို ရရှိခဲ့ပါသည်။
Architecture Overview
ဒီ setup မှာ core design က high availability ကို အဓိကထားပါတယ်။ Control Plane access အတွက် HAProxy ကို external load balancer အဖြစ် သုံးခဲ့ပြီး, Kubernetes API server traffic ကို master nodes တွေဆီ distribute လုပ်ခဲ့ပါတယ်။ Node တစ်ခု down သွားရင်လည်း cluster access မပြတ်သွားအောင် VIP-based failover pattern ကို ထည့်သုံးခဲ့ပါတယ်။
Application traffic အတွက် Istio Ingress Gateway ကို အသုံးပြုခဲ့ပါတယ်။ simple Ingress controller ထက်ပိုပြီး traffic routing, retries, canary release, mTLS, and observability အတွက် ပိုကောင်းတဲ့ control ရခဲ့ပါတယ်။
Persistent storage အတွက် Longhorn ကို သုံးခဲ့ပါတယ်။ Stateful workloads တွေအတွက် replication, backup, snapshot, and recovery လိုအပ်ချက်တွေကို Longhorn က fairly well handle လုပ်ပေးနိုင်ပါတယ်။ ဒါပေမယ့် production မှာတော့ storage tuning က မဖြစ်မနေလိုပါတယ်။
Control Plane HA Architecture
Kubernetes HA Cluster တစ်ခု၏ အသက်သွေးကြောသည် ၎င်း၏ Control Plane (Master Nodes) ပဲဖြစ်ပါသည်။ API Server သို့မဟုတ် Etcd သည် တစ်စုံတစ်ရာ ချို့ယွင်းသွားပါက Cluster တစ်ခုလုံး လည်ပတ်နိုင်စွမ်း ရပ်တန့်သွားမည် ဖြစ်ပါသည်။ ထို့ကြောင့် Control Plane များ ပျက်ယွင်းမှုမရှိစေရန်အတွက် အနည်းဆုံး Master Node (3) nodes ကို အသုံးပြုခဲ့ပြီး၊ Cluster ၏ State များကို သိမ်းဆည်းရန်အတွက် Etcd ကို ခိုင်မာစွာ တည်ဆောက်ခဲ့ပါသည်။
API Server Load Balancing with Keepalived and HAProxy
Master Node 3 ခုလုံးရှိ kube-apiserver သို့ ဝင်ရောက်လာသော Request များကို မျှဝေပေးနိုင်ရန် Load Balancing နှင့် Node တစ်ခုကျသွားပါက အလိုအလျောက် အခြား Node သို့ ပြောင်းလဲချိတ်ဆက်ပေးနိုင်ရန် Failover အတွက် HAProxy နှင့် Keepalived ကို ပေါင်းစပ်အသုံးပြုခဲ့ပါသည်။
Keepalived Mechanism
Keepalived သည် Virtual Router Redundancy Protocol (VRRP) ကို အသုံးပြု၍ physical IP address များအပေါ်တွင် Virtual IP (VIP) တစ်ခုကို ဖန်တီးပေးပါသည်။ ဥပမာအားဖြင့် Master Node သုံးခု၏ IP များသည် 10.238.40.162, 10.238.40.163, 10.238.40.164 ဖြစ်ပါက၊ VIP အဖြစ် Network အတွင်း အလွတ်ရှိနေသော 10.238.40.166 ကဲ့သို့သော IP တစ်ခုကို သတ်မှတ်နိုင်ပါသည် ။ ဤအဆင့်တွင် Master Node များအကြား အချင်းချင်း Heartbeats ကို စဉ်ဆက်မပြတ် ဖလှယ်နေကြပြီး Primary Node အဖြစ် တာဝန်ယူထားသော Server သည် ရုတ်တရက် Down သွားပါက ၊ Keepalived သည် VIP ကို အခြား ကျန်ရှိနေသော Backup Node သို့ ချက်ချင်း ရွှေ့ပြောင်းပေးခြင်းဖြင့် Cluster ကို အဆက်မပြတ် လည်ပတ်နိုင်စေပါသည် ။
HAProxy Mechanism
HAProxy သည် VIP ၏ Port 6443 သို့ ဝင်ရောက်လာသော TCP Request များကို Master Node များရှိ API Server များထံသို့ Round-robin စနစ်ဖြင့် ဖြန့်ဝေပေးပါသည် ။ အကယ်၍ Master Node တစ်ခုခုရှိ kube-apiserver သည် အလုပ်မလုပ်တော့ပါက HAProxy ၏ Health Check စနစ်က ၎င်းကို အလိုအလျောက် ဖယ်ရှားပေးမည် ဖြစ်ပါသည်။
example အနေနဲ့ HAProxy ရဲ့ configuration ကိုထည့်ပေးထားပါတယ်။
global
    log /dev/log local0
    log /dev/log local1 notice
    maxconn 20000
    daemon

defaults
    mode tcp
    log global
    retries 3
    timeout connect 10s
    timeout client 300s
    timeout server 300s

frontend kubernetes-apiserver
    bind *:6443
    mode tcp
    option tcplog
    default_backend kubernetes-master-nodes

backend kubernetes-master-nodes
    mode tcp
    balance roundrobin
    option tcp-check
    server master1 10.238.40.162:6443 check fall 3 rise 2
    server master2 10.238.40.163:6443 check fall 3 rise 2
    server master3 10.238.40.164:6443 check fall 3 rise 2
ဤ Configuration တွင် fall 3 rise 2 သည် အလွန်အရေးကြီးပါသည်။ ဆိုလိုသည်မှာ ဆက်တိုက် (၃) ကြိမ် Health Check ကျရှုံးမှသာ Server ကို Downtime အဖြစ်သတ်မှတ်မည်ဖြစ်ပြီး၊ ပြန် up လာသောအခါ ဆက်တိုက် (၂) ကြိမ် အောင်မြင်မှသာ Up အဖြစ် ပြန်လည်လက်ခံမည် ဖြစ်ရာ၊ Network မငြိမ်မသက်ဖြစ်မှုကြောင့် Serverများ မကြာခဏ Flapping ဖြစ်ခြင်း ကို ကာကွယ်ပေးနိုင်ပါသည်။
Kubeadm Configuration and Control Plane Endpoint
Cluster ကို စတင်တည်ဆောက်ရာတွင် (kubeadm init) ဆိုပြီး ပုံမှန် Node IP တစ်ခုတည်းကို အသုံးပြုမည့်အစား Keepalived မှ ဖန်တီးထားသော VIP ကို controlPlaneEndpoint အဖြစ် မဖြစ်မနေ သတ်မှတ်ရပါမည် ။ သို့မှသာ Worker Node များနှင့် အခြား Control Plane Node များသည် Cluster သို့ ချိတ်ဆက်ရာတွင် အဆိုပါ VIP (Load Balancer) မှတစ်ဆင့် အမြဲတမ်းချိတ်ဆက်နိုင်မည်ဖြစ်ပြီး HA စနစ်ကို အပြည့်အဝ အသက်ဝင်စေမည်ဖြစ်သည် ။
ဤကဲ့သို့ controlPlaneEndpoint ကို ကြိုတင်ပြင်ဆင်ခြင်းမရှိဘဲ Single Control Plane အဖြစ် ဦးစွာတည်ဆောက်ပြီးမှ၊ နောင်တစ်ချိန်တွင် HA သို့ ပြောင်းလဲရန် kubeadm တွင် ထောက်ပံ့ထားခြင်းမရှိဘဲ ရှုပ်ထွေးသော ပြဿနာများကို ဖြစ်ပေါ်စေနိုင်ပါသည်။
example အနေနဲ့ Cluster Configuration လဲကြည့်ရှုနိုင်ပါသည်။
apiVersion: kubeadm.k8s.io/v1beta3
kind: ClusterConfiguration
kubernetesVersion: v1.31.0
controlPlaneEndpoint: "10.238.40.166:6443"
networking:
  podSubnet: "10.244.0.0/16"
  serviceSubnet: "10.96.0.0/12"
အဆိုပါ Config ကို အသုံးပြု၍ Cluster ကို Init လုပ်ပြီးနောက်၊ အခြားသော Master Node များကို ချိတ်ဆက်သည့်အခါ --control-plane နှင့် --certificate-key flag များကို အသုံးပြု၍ Certificates ကို လုံခြုံစွာ မျှဝေရယူနိုင်မည် ဖြစ်ပါသည်။
Container Runtime Transition: Containerd and Systemd Cgroup Driver
Kubernetes ရဲ့ version 1.24 အထက်ကနေစပြီး Dockershim ကိုဖြုတ်လိုက်ပြီး Docker အစား containerd ကို အဓိက Container Runtime (CRI) အဖြစ် အသုံးပြုလာကြပါသည် ။ Containerd ကို အသုံးပြုရာ၌ Cgroup (Control Group) Driver ကို စနစ်တကျ ချိန်ညှိမှုသည် အလွန်အရေးကြီးသော အဆင့်တစ်ခု ဖြစ်ပါသည်။
Issues Arising from Cgroup Driver Mismatches
Linux Server များတွင် Pod များ၏ CPU နှင့် Memory ကဲ့သို့သော resources တွေကို manage လုပ်ရန် cgroups ကို အသုံးပြုပါသည်။ သာမန်အားဖြင့် Container Runtime များသည် cgroupfs ကို အသုံးပြုလေ့ရှိသော်လည်း၊ ဥပမာ - Ubuntu, RHEL သည် OS ရဲ့ Process ID (PID 1) အဖြစ် systemd ကို အသုံးပြုကြပါသည်။
အကယ်၍ Kubernetes ၏ Kubelet နှင့် Containerd သည် cgroupfs ကို သုံးနေပြီး၊ OS သည် systemd ကို သုံးနေပါက၊ စနစ်တစ်ခုတည်းတွင် cgroup manager နှစ်ခု ပြိုင်တူအလုပ်လုပ်နေမည် ဖြစ်ပါသည်။ ဤကဲ့သို့ Mismatch ဖြစ်ပေါ်ပါက resources management ကိုပိုရှုပ်ထွေးသွားစေပြီး၊ Node များ ရုတ်တရက် အလုပ်မလုပ်တော့ခြင်း၊ သို့မဟုတ် resources မလုံလောက်မှုကြောင့် ပြဿနာများကို ဖြစ်ပေါ်စေနိုင်ပါသည်။
The Solution and Optimal Configuration
ဤပြဿနာကို ဖြေရှင်းရန်အတွက် kubelet နှင့် containerd နှစ်ခုစလုံးကို systemd cgroup driver ကိုသာ တူညီစွာ အသုံးပြုရန် ပြင်ဆင်ပေးရမည် ဖြစ်ပါသည်။ Containerd ၏ အဓိက config file ဖြစ်သော /etc/containerd/config.toml တွင် အောက်ပါအတိုင်း SystemdCgroup = true ဟု ထည့်သွင်းပေးရမည်ဖြစ်သည်။
version = 2
[plugins]
  [plugins."io.containerd.grpc.v1.cri"]
    [plugins."io.containerd.grpc.v1.cri".containerd]
      [plugins."io.containerd.grpc.v1.cri".containerd.runtimes]
        [plugins."io.containerd.grpc.v1.cri".containerd.runtimes.runc]
          runtime_type = "io.containerd.runc.v2"
          [plugins."io.containerd.grpc.v1.cri".containerd.runtimes.runc.options]
            SystemdCgroup = true
Config ကို ပြင်ဆင်မှုများ ပြီးပါက systemctl restart containerd နှင့် systemctl restart kubelet တို့ကို လုပ်ဆောင်ပေးခြင်းဖြင့် Node များ တည်ငြိမ်စွာ အလုပ်လုပ်လာမည်ကို တွေ့မြင်ရမည် ဖြစ်ပါသည်။
Network Foundation: MetalLB, CNI, and MTU Optimization
Kubernetes Cluster တစ်ခု၏ Performance သည် ၎င်း၏ အောက်ခြေရှိ Network အပေါ်တွင် များစွာမူတည်နေပါသည်။ အထူးသဖြင့် On-Premises Environment တွင် Cloud Provider များ၏ အထောက်အပံ့မပါဝင်သဖြင့် ကွန်ရက်ပိုင်း ကို ကိုယ်တိုင် အပြည့်အဝ တာဝန်ယူ တည်ဆောက်ရပါသည်။
Configuring MetalLB Layer 2 for Bare-Metal
Cloud Providers များ (ဥပမာ - AWS, GCP) တွင် Kubernetes Service ကို LoadBalancer type ဖြင့် ထုတ်လိုက်ပါက Cloud ၏ Load Balancer (ဥပမာ ALB, NLB) ကို အလိုအလျောက် ချိတ်ဆက်ပေးပြီး Public IP တစ်ခုကို ရရှိပါသည်။ သို့သော် On-Premises တွင် ထိုသို့လုပ်ဆောင်ပေးမည့် အရာမရှိသောကြောင့် LoadBalancer Service များကို ဖန်တီးပါက အမြဲတမ်း <pending> အခြေအနေတွင်သာ ရှိနေမည်ဖြစ်ပါသည်။ ဤ ပြသနာကို ဖြေရှင်းရန် MetalLB ကို အသုံးပြုရပါသည်။
MetalLB သည် Layer 2 (ARP/NDP) သို့မဟုတ် BGP mode များဖြင့် အလုပ်လုပ်နိုင်ပါသည်။ BGP သည် အဆင့်မြင့် Router များလိုအပ်ပြီး ပြင်ဆင်ရ ရှုပ်ထွေးသော်လည်း၊ Layer 2 mode သည် အထူးတလည် ပြင်ဆင်မှု များစွာမလိုအပ်ဘဲ ရိုးရှင်းစွာ အလုပ်လုပ်နိုင်သည့်အတွက် On-premises ပတ်ဝန်းကျင်များတွင် တွင်ကျယ်စွာ အသုံးပြုကြပါသည်။
MetalLB အား လုပ်ငန်းလည်ပတ်ရန်အတွက် IP Address များ ခွဲဝေချထားပေးရန် IPAddressPool နှင့် ၎င်း IP များကို Network အတွင်းသို့ ကြေငြာရန် L2Advertisement Custom Resources (CRDs) များကို အသုံးပြုရပါသည်။
MetalLB Layer 2 Example Configuration
apiVersion: metallb.io/v1beta1
kind: IPAddressPool
metadata:
  name: production-pool
  namespace: metallb-system
spec:
  addresses:
  - 192.168.100.240-192.168.100.250
---
apiVersion: metallb.io/v1beta1
kind: L2Advertisement
metadata:
  name: production-advertisement
  namespace: metallb-system
spec:
  ipAddressPools:
  - production-pool
Layer 2 mode တွင် အလုပ်လုပ်ပုံမှာ၊ LoadBalancer Service တစ်ခု ဖန်တီးလိုက်သည်နှင့် MetalLB သည် production-pool ထဲမှ IP တစ်ခုကို assign ချပေးပါသည်။ ထို့နောက် Cluster အတွင်းရှိ Node တစ်ခုခုပေါ်တွင် အလုပ်လုပ်နေသော MetalLB Speaker pod သည် အဆိုပါ IP အတွက် ARP request များကို လက်ခံဖြေကြားပေးရန် (Announce) ကို တာဝန်ယူလိုက်ပါသည်။ ထို့ကြောင့် ပြင်ပမှ လာသော ကွန်ရက်လမ်းကြောင်းများသည် အဆိုပါ Node သို့ ရောက်ရှိသွားပြီး၊ ၎င်းမှတစ်ဆင့် Kube-Proxy က သက်ဆိုင်ရာ Application Pod များထံသို့ ဆက်လက်ပေးပို့ပါသည်။
The Silent Threat: CNI and MTU Mismatches
Cluster ၏ ကွန်ရက်ချိတ်ဆက်မှုများအတွက် Calico သို့မဟုတ် Cilium ကဲ့သို့သော Container Network Interface (CNI) များကို အသုံးပြုလေ့ရှိပါသည် ။ ဤနေရာတွင် အထူးဂရုပြုရမည့် အရေးကြီးဆုံး ကွန်ရက်ပိုင်းဆိုင်ရာ ကန့်သတ်ချက်မှာ MTU (Maximum Transmission Unit) သတ်မှတ်ချက် ဖြစ်ပါသည်။ MTU သည် ကွန်ရက်ပေါ်တွင် တစ်ကြိမ်လျှင် ပို့လွှတ်နိုင်သော အကြီးဆုံး Packet အရွယ်အစားကို ကိုယ်စားပြုပါသည်။
သာမန် Physical Network ၏ Ethernet MTU သည် အများအားဖြင့် 1500 bytes ဖြစ်ပါသည်။ သို့သော် Calico သို့မဟုတ် Flannel ကဲ့သို့သော CNI များသည် Pod များအကြား ဆက်သွယ်ရန်အတွက် VXLAN သို့မဟုတ် IP-in-IP ကဲ့သို့သော Encapsulation နည်းလမ်းများကို အသုံးပြုကြပါသည်။ ဤသို့ အသုံးပြုသည့်အခါ မူလ Packet ပေါ်တွင် Header အသစ်များ ထပ်မံပေါင်းထည့်ရပါသည် ။ VXLAN သည် 50 bytes နေရာယူပြီး၊ IP-in-IP သည် 20 bytes နေရာယူပါသည်။ ထို့ကြောင့် CNI ၏ လက်တွေ့အသုံးပြုနိုင်သော MTU သည် Physical MTU ထက် အနည်းဆုံး 50 bytes နည်းပါးနေရပါမည်။ (ဥပမာ - 1450 bytes)
Consequences of an MTU Mismatch
အကယ်၍ Node ၏ MTU (1500) နှင့် CNI ၏ MTU ကိုက်ညီမှုမရှိဘဲ (ဥပမာ CNI တွင်လည်း 1500 ဟု မှားယွင်းစွာ သတ်မှတ်မိပါက)၊ Network Packet များသည် ကွန်ရက်ထဲသို့ ရောက်သောအခါ ခွင့်ပြုထားသော အရွယ်အစားထက် ကြီးမားနေသဖြင့် Packet Fragmentation များ အဆက်မပြတ် ဖြစ်ပေါ်စေနိုင်ပါသည်။
လက်တွေ့လုပ်ငန်းခွင်တွင် ဤ MTU Mismatch ကြောင့် အောက်ပါဆိုးကျိုးများကို ကြုံတွေ့ရတတ်ပါသည်။
Database Transactions Failures: data အမြောက်အမြား ပို့လွှတ်ရသော Database များသည် Latency မြင့်တက်လာပြီး Connection များ ပြတ်တောက်သွားတတ်ပါသည်။
Longhorn Storage Replication Impact: Storage Network သည် MTU အလွန်အရေးကြီးပါသည်။ MTU မှားယွင်းနေပါက Storage Volume များ Sync လုပ်ရာတွင် အလွန်နှေးကွေးသွားပြီး Volume များ Degraded ဖြစ်ခြင်း၊ Rebuild ပြုလုပ်မှု failed ဖြစ်ခြင်းများကြုံတွေ့ရနိုင်ပါသည်။
ဤပြဿနာများကို ရှောင်ရှားရန် ping -s 1450 -M do <Node-IP> ကဲ့သို့သော Command များဖြင့် Packet Fragmentation ဖြစ်မဖြစ် စစ်ဆေးသင့်ပြီး၊ calico-config ConfigMap အတွင်းရှိ mtu တန်ဖိုးကို မိမိ၏ Infrastructure နှင့် ကိုက်ညီအောင် တိကျစွာ လျှော့ချသတ်မှတ်ပေးရန် လိုအပ်ပါသည်။
Storage Optimization: Tuning Longhorn for Production
Kubernetes တွင် Stateful Application များ (ဥပမာ - Databases, Message Queues) အတွက် Persistent Storage သည် မရှိမဖြစ်လိုအပ်ပါသည်။ Longhorn သည် Rancher မှ ဖန်တီးထားသော Cloud-Native Storage စနစ်ဖြစ်ပြီး ရိုးရှင်းလွယ်ကူသော်လည်း၊ Production Environment မှာ အသုံးပြုရန်အတွက် သေချာစွာ Tuning လုပ်ဖို့လိုအပ်ပါသည်။
Disaster Recovery and Backup Automation
Longhorn မှာ data locality and replica strategy ကို ထိန်းချုပ်ပေးနိုင်ပါတယ်။ ဒီ feature ကို properly tune လုပ်ထားရင် workload latency ကို လျှော့ပေးနိုင်ပါတယ်။ System Error၊ Human Error ဖြစ်ပေါ်ပါက data များ မဆုံးရှုံးစေရန်အတွက်လည်း အောက်ပါ Backup Strategy များကို ချမှတ်အကောင်အထည်ဖော်သင့်ပါသည်။
External Backup Target: AWS S3, Google Cloud Storage, သို့မဟုတ် Office Network တွင်းရှိ NFS Server တစ်ခုခုကို External Backup Target အဖြစ် သတ်မှတ်သင့်ပါသည်။ Cluster ထဲက data များ မဆုံးရှုံးအောင် Backup Storage မှ Data များကို အလွယ်တကူ ပြန်ပြီး Restore လုပ်နိုင်မည်ဖြစ်ပါသည်။
Recurring Backups : အရေးကြီးသော Volume များအားလုံးအတွက် အလိုအလျောက် Backup ယူသည့် အစီအစဉ်များ (Cron jobs) ကို StorageClass မှတစ်ဆင့်သော်လည်းကောင်း (ဥပမာ -
recurringJobSelector) အသုံးပြု၍ Longhorn UI မှတစ်ဆင့်သော်လည်းကောင်း သတ်မှတ်ထားရပါမည် ။ ဤသို့ပြုလုပ်ခြင်းဖြင့် data များ လုံခြုံမှုကို အာမခံနိုင်ပါသည်။Snapshot Management and Space Efficiency: Longhorn သည် Replica များ ပြန်လည်တည်ဆောက်ရာတွင် system မှ အလိုအလျောက် Snapshot များကို ဖန်တီးပါသည်။ ဤ Snapshot များသည် အချိန်ကြာလာသည်နှင့်အမျှ Diskspace များကို စားသုံးလာမည်ဖြစ်ရာ ၎င်းတို့ကို ပုံမှန်ရှင်းလင်းပေးမည့် (Cleanup) Recurring Job များကိုလည်း မဖြစ်မနေ ထည့်သွင်းစဥ်းစားရပါမည် ။ ထို့အပြင် File System အဟောင်းများကို ရှင်းလင်းရန်
filesystem-trimလုပ်ငန်းစဉ်များကိုပါ အချိန်မှန် လုပ်ဆောင်ပေးခြင်းဖြင့် Storage စွမ်းဆောင်ရည်ကို ထိန်းသိမ်းထားနိုင်ပါသည်။
Advanced Traffic Management: Istio Ingress Gateway
Application များဆီသို့ External မှ ဝင်ရောက်လာသော HTTP/HTTPS (Ingress Traffic) များကို စီမံခန့်ခွဲရန်အတွက် ရိုးရှင်းသော Nginx Ingress ကို အသုံးပြုနိုင်သော်လည်း၊ ပိုမိုရှုပ်ထွေးသော Microservices Architecture များအတွက် အဆင့်မြင့် လုပ်ဆောင်ချက်များကို ပေးစွမ်းနိုင်သော Istio Ingress Gateway ကို အသုံးပြုခြင်းသည် အကောင်းဆုံး ရွေးချယ်မှုဖြစ်ပါသည်။
Advantages of Istio Ingress Gateway
Istio Ingress Gateway သည် Istio Service Mesh ၏ အစိတ်အပိုင်းတစ်ခုဖြစ်ပြီး Envoy Proxy ကို အခြေခံ၍ တည်ဆောက်ထားပါသည်။ ၎င်းသည် Cluster အတွင်းသို့ ဝင်ရောက်လာသော Traffic များအားလုံးအတွက် တစ်ခုတည်းသော Single Entry Point အဖြစ် လုပ်ဆောင်ပေးကာ Load Balancing, SSL/TLS Termination (Certificate Management), နှင့် Authentication ကဲ့သို့သော လုံခြုံရေး လုပ်ဆောင်ချက်များကို ပံ့ပိုးပေးပါသည်။
Istio တွင် Traffic Management ကို ဖွဲ့စည်းရာ၌ Traditional Ingress Resource ထက် ပိုမိုပြောင်းလွယ်ပြင်လွယ်ရှိသော Custom Resources နှစ်ခုဖြစ်သည့် Gateway နှင့် VirtualService တို့ကို တွဲဖက်အသုံးပြုရပါသည်။
Gateway Resource: မည်သည့် Port များ (example - TCP Port 80, 443) ကို open ထားမည်၊ မည်သည့် Hostname များကို လက်ခံမည် နှင့် SSL/TLS Certificate များကို မည်သို့ ချိတ်ဆက်မည် စသည်တို့ကို အတိအကျ သတ်မှတ်ပေးသည့် အစိတ်အပိုင်း ဖြစ်ပါသည်။
VirtualService Resource: Gateway မှ တစ်ဆင့် အောင်မြင်စွာ ဝင်ရောက်လာသော Traffic များကို မည်သည့် Kubernetes Service များထံသို့ မည်သည့် Routing Rules ဖြင့် ပို့ဆောင်မည်ကို အသေးစိတ် သတ်မှတ်ပေးပါသည်။
Advanced Use Cases of VirtualService
လက်တွေ့လုပ်ငန်းခွင်တွင် VirtualService ကို အသုံးပြု၍ Routing များကို ပြုလုပ်နိုင်ပါသည်။ ဥပမာအားဖြင့် -
Path-based Routing: Hostname တစ်ခုတည်းမှ ဝင်လာသော Traffic များကို URL Path အလိုက် (ဥပမာ -
/api/usersနှင့်/api/payments) မတူညီသော Microservices များထံ တိကျစွာ ခွဲဝေပို့ဆောင်ခြင်း။Traffic Shifting (Canary Releases): Software Version အသစ်တစ်ခုကို Deployment လုပ်ရာ တွင် အန္တရာယ်ကင်းစေရန်အတွက် Traffic ၏ 90% ကို ယခင် Version အဟောင်း (v1) သို့ ပို့ပြီး ကျန် 10% ကိုသာ Version အသစ် (v2) သို့ ပို့ဆောင်စမ်းသပ်ခြင်းတို့ကို လွယ်ကူစွာ လုပ်နိုင်ပါသည်။
Resiliency & Fault Tolerance: Network ချို့ယွင်းမှုများအတွက်
retriesနှင့်timeoutများကို Application Code ထဲတွင် ရေးစရာမလိုဘဲ Istio ဘက်မှ တပါတည်း ထည့်သွင်းသတ်မှတ်ပေးနိုင်ခြင်းကြောင့် အားသာချက်တစ်ခုဖြစ်ပါသည်။
ဒါပေမယ့် complexity ကတော့ တိုးလာမှာပါပဲ။ HAProxy နဲ့ Istio ကြားမှာ PROXY protocol သုံးပြီး original client IP ကို preserve လုပ်ရတဲ့အပိုင်းလိုမျိုးက beginner-friendly မဟုတ်ပါဘူး။ Debugging လုပ်ရတာလည်း ပိုပြီး harder ဖြစ်နိုင်ပါတယ်။ ဒါကြောင့် ကျွန်တော်တို့ ရရှိခဲ့တဲ့ lesson ကတော့ Istio က powerful ဖြစ်ပေမယ့်, production environment မှာ design ကို simple, observable, and well-documented ဖြစ်အောင် ထားရမယ်ဆိုတာပါ။
Monitoring Is Part of the Architecture
Monitoring မပါဘဲ production cluster တည်ဆောက်တာက blindfold လိုပါပဲ။ Cluster က running ဖြစ်နေတယ်လို့ထင်ရပေမယ့် hidden pressure တွေက slowly build up ဖြစ်နေတတ်ပါတယ်။ ဒါကြောင့် Prometheus, Grafana, metrics-server, and alerting rules တွေကို မဖြစ်မနေ ထည့်ခဲ့ပါတယ်။ Especially storage capacity, latency, node disk usage, API server health, and control plane reachability တို့ကို close watch လုပ်ထားရပါတယ်။ Production experience က သင်ပေးတာကတော့ “it works” ဆိုတာနဲ့မလုံလောက်ဘဲ “we can see it, measure it, and recover it quickly” ဖြစ်ရမယ်ဆိုတာပဲဖြစ်ပါတယ်။
The Final Takeaway
ဒီ project ကနေ အကြီးမားဆုံး ရခဲ့တဲ့ lesson ကတော့ open-source stack တွေကို combine လုပ်ပြီး production-grade platform တစ်ခုတည်ဆောက်လို့ရတယ်ဆိုတာပါ။ ဒါပေမယ့် success ကို open source tools တွေကပဲ မပေးပါဘူး။ Architecture decisions, careful tuning, testing, and operational discipline က အဓိကပဲဖြစ်ပါတယ်။
HAProxy က control plane ကို stable access ပေးတယ်။ Istio က application traffic ကို smart way နဲ့ manage လုပ်ပေးတယ်။ Longhorn က stateful workloads အတွက် resilient storage layer တစ်ခုဖြစ်လာတယ်။ ဒါပေမယ့် ဒါတွေအားလုံးကို production-ready ဖြစ်အောင်လုပ်ဖို့ network, runtime, storage, and monitoring တို့ကို end-to-end အဖြစ် စဉ်းစားရပါတယ်။
Thanks for reading, and I appreciate your time.