

What is ADVPN? How to Config ADVPN on Fortigate
Search for a command to run...
No comments yet. Be the first to comment.
LAB Diagram Configure the topology as per the diagram Configure VLAN_10 VLAN_20 VLAN_30 on Core_SW Configure 802.1Q Trunk Link Between Access Switches and Core_SW Configure VTP version 2 on Core_SW Configure VTP domain name lab.com Make sure rest of...
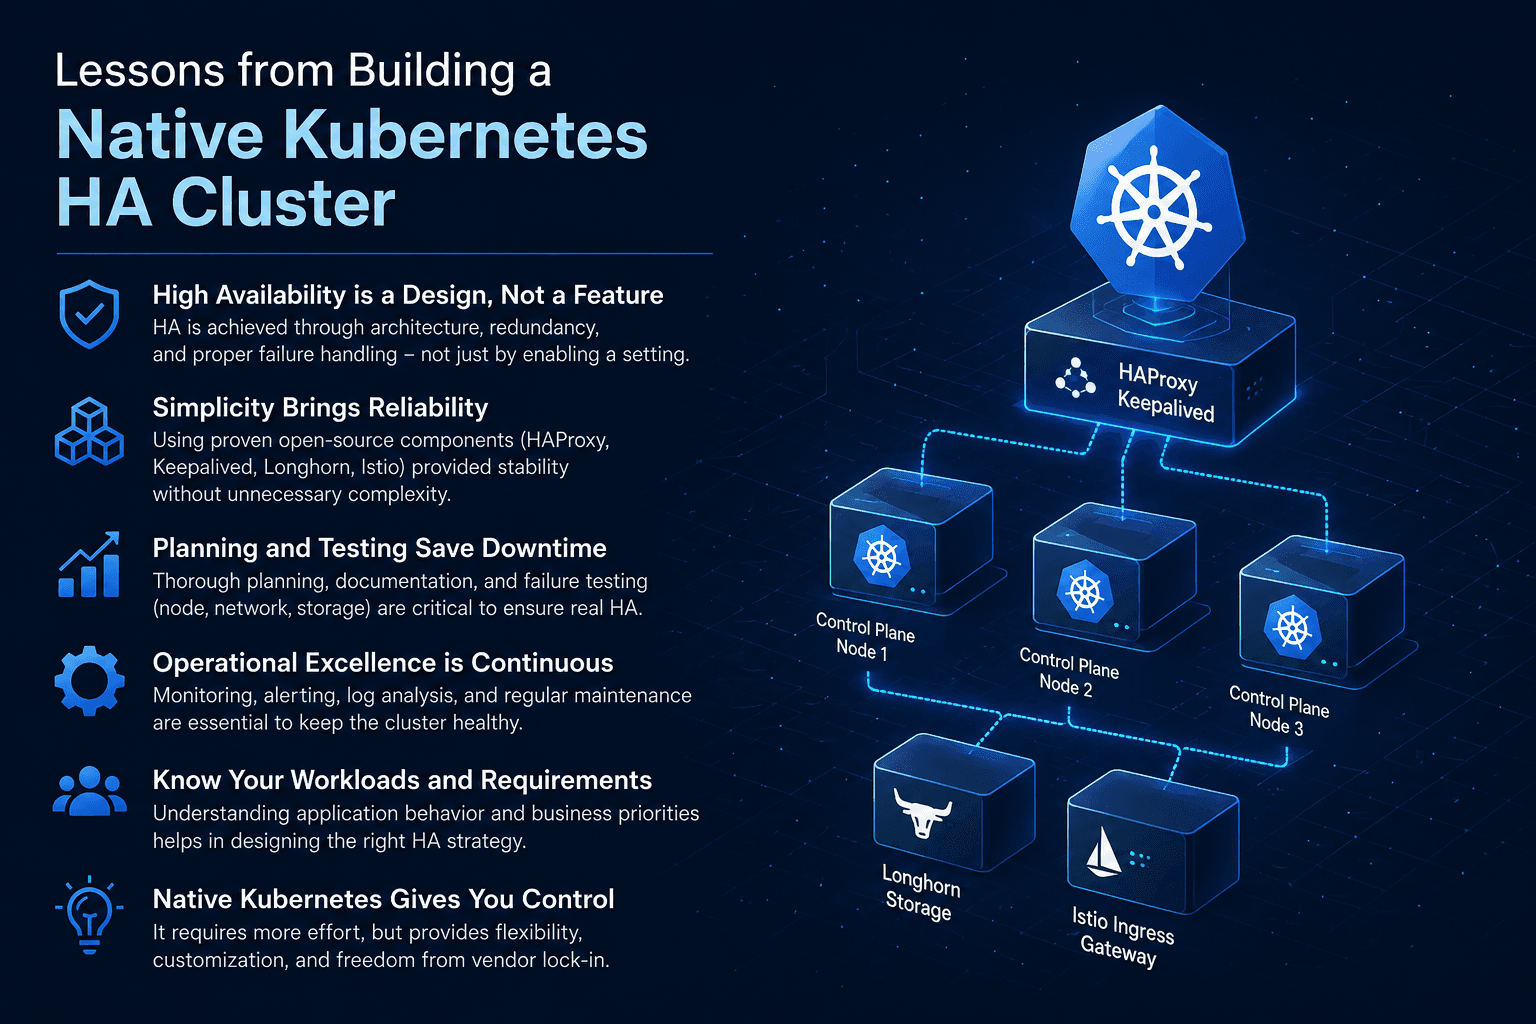
Production environment အတွက် Kubernetes HA cluster တစ်ခုကို from scratch တည်ဆောက်တာဟာ simple deployment တစ်ခုထက် အများကြီးပိုပြီး challenging ဖြစ်စေပါတယ်။ Managed Kubernetes service တစ်ခုကိုသုံးရင် pl
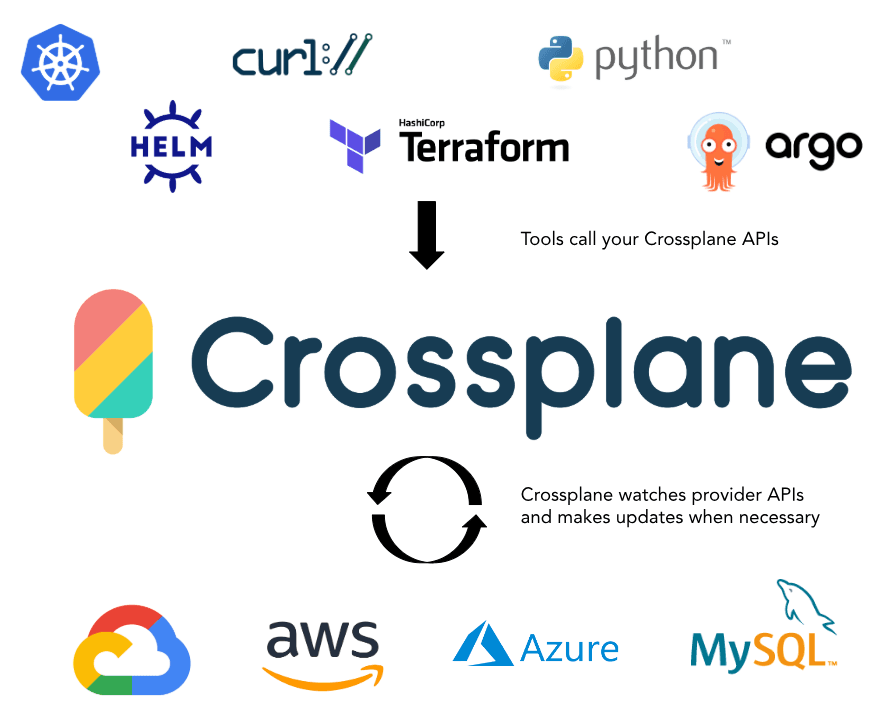
Cloud Native လောကမှာ Infrastructure as Code (IaC) လို့ပြောလိုက်ရင် လူတိုင်းပြေးမြင်ကြတာက Terraform ပါ။ ဒါပေမဲ့ အခုနောက်ပိုင်းမှာ Kubernetes-native ဖြစ်တဲ့ Crossplane ကလည်း အရမ်းကို ရေပန်းစားလာပါတယ်။ E
Kubernetes cluster တွေကို UI ကနေမြင်ရ၊ စီမံရ လွယ်ကူစေတဲ့ dashboard tool တွေထဲမှာ Kubernetes Dashboard က အရင်က လူသုံးများခဲ့တဲ့ official web UI တစ်ခုဖြစ်ပါတယ်။ ဒါပေမယ့် 2026 ခုနှစ် January 21 ရက်မှာ re
What is Vagrant? Vagrant ဆိုတာကတော့ Virtual Machines တွေကိုတည်ဆောက်ဖို့နဲ့ manage လုပ်ဖို့အတွက် အသုံးပြုရတဲ့ command-line tool တစ်ခုပဲဖြစ်ပါတယ်။ Vagrant သည် ပုံမှန် virtualbox, vmware တို့မှာ Virtual
Amazon EKS cluster မှာ OpenID Connect (OIDC) provider ကို associate လုပ်ရခြင်းရဲ့ အဓိကအကြောင်းရင်းကတော့ Security နဲ့ Access Control ကို ပိုမိုကောင်းမွန်အောင်ပြုလုပ်နိုင်ဖို့ဖြစ်ပါတယ်။ အဓိကအားဖြင့် အချက် (၂) ချက်ရှိပါတယ်။ To use IAM Roles for Service...
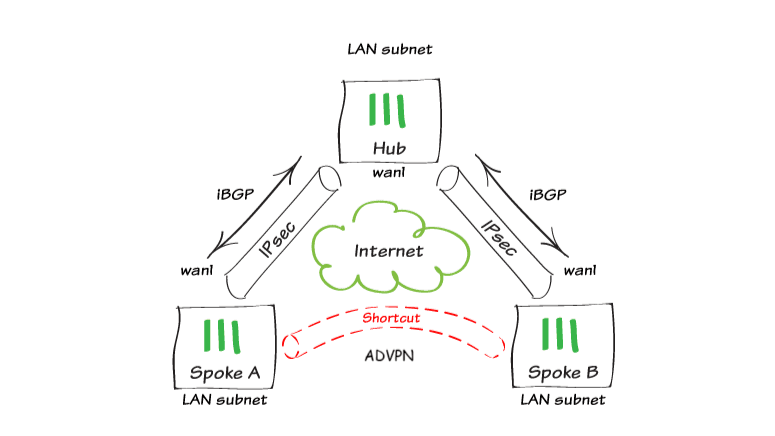
အားလုံးပဲ မင်္ဂလာပါခင်ဗျ၊ ကျွန်တော် ဒီနေ့ပြောပြပေးသွားမှာကတော့ ADVPN အကြောင်းလေးပဲဖြစ်ပါတယ်၊ Auto Discovery VPN (ADVPN) က Spoke sites တွေက topology ရဲ့ Hub ကို route မသွားတော့ပဲ Spoke တစ်ခုနဲ့တစ်ခု လိုအပ်ချက်အရ direct tunnels (dynamic) တွေရဖို့ အသုံးပြုတဲ့ IPsec Technology ရဲ့ traditional hub and spoke vpn ဖြစ်ပါတယ်၊
ADVPN ရဲ့ main advantage ကတော့ hub and spoke topology မှာ full mesh ပေးနိုင်တာပဲဖြစ်တယ်၊ ၎င်းက spoke to spoke ကြား connection အပြည့်အဝရရှိဖို့အတွက် delay ဖြစ်မှုကို လျှော့ချပေးတယ်၊ နောက် အလွန်ကြီးမားတဲ့ full mesh VPN network က issues တွေကိုလဲ ဖြေရှင်းပေးနိုင်တယ် ဖြစ်ပါတယ်၊
Hub နဲ့ Spoke offices တွေမှာ internet connections နှစ်ခု(or)နှစ်ခုထက်ပိုရှိရင် dual-hub ADVPN network လဲတည်ဆောက်နိုင်သလို၊ SD-WAN technology သုံးပြီး Spoke offices တွေကို dynamic tunnels တွေနဲ့ user တွေရဲ့ traffic တွေကို load balance အနေနဲ့လဲ အသုံးပြုနိုင်မယ် ဖြစ်ပါတယ်၊
Topology အနေနဲ့ကတော့ Hub တစ်ခု၊ Spoke နှစ်ခုနဲ့ သုံးပြသွားမှာဖြစ်ပါတယ်၊
ADVPN ကတော့ other spokes တွေရဲ့ routesတွေကို affect မဖြစ်စေပဲ spoke နှစ်ခုကြား route traffic တွေ peer connection တွေရှိစေဖို့ internal routing protocol တစ်ခုသုံးပေးဖို့လိုအပ်ပါတယ်၊
Fortigate ရဲ့ ADVPN ကတော့ internal routing protocol အနေနဲ့ BGP, OSPF, RIP တွေကို support တယ်၊ အဲ့တော့ ကိုယ်နှစ်သက်တဲ့ routing protocol ကိုအသုံးပြုနိုင်ပါတယ်၊ ဒီ LAB မှာတော့ ကျွန်တော်က routing protocol ကို iBGP နဲ့သုံးသွားမှာဖြစ်ပါတယ်၊
ပြီးသွားရင်တော့ hub and spoke tunnel ထိုးမှာဖြစ်တဲ့အတွက် IPsec hub and spoke ကိုအသုံးပြုသွားမှာဖြစ်ပါတယ်၊
Ok, Let’s start with Lab!

Configure BGP settings on FGT-Hub:
On FGT-Hub, go to Network > BGP
In the Local AS field, enter 65400
In the Router ID field, enter 0.0.0.101

Under Neighbor Groups, click Create New
Enter the following settings:
Name : Branch-Peers
Remote AS : 65400
Activate IPv4 : Enable
Attribute unchanged : Disable
Route Reflector client : Enable
Capability: route refresh : Enable

Click Ok
Click Apply to save the BGP settings.
Configure BGP settings on FGT-Spoke1:
On FGT-Spoke1, go to Network > BGP
In the Local AS field, enter 65400
In the Router ID field, enter 0.0.0.111

Click Apply to save the BGP settings.
Configure BGP settings on FGT-Spoke2:
On FGT-Spoke2, go to Network > BGP
In the Local AS field, enter 65400
In the Router ID field, enter 0.0.0.112

Click Apply to save the BGP settings.
လိုအပ်တဲ့ routing protocol ကို create လုပ်ပြီးသွားပြီဖြစ်တဲ့အတွက် IPsec VPN (Hub and Spoke) ကို ထပ်မံ create လုပ်သွားမှာဖြစ်ပါတယ်၊
Configure VPN on FGT-Hub with the IPsec Wizard:
On FGT-Hub, navigate to VPN > IPsec Wizard.
On the VPN Setup page, use the following settings:
Name : Branches
Template type : Hub-and-Spoke
Role : Hub

Click Next
On the Authentication page, use the following settings:
Incoming Interface: ISP (port4)
Authentication Method: Pre-shared Key
Pre-shared Key: Labtest098&

Click Next >
On the Tunnel interface page, use the following settings:
Tunnel IP : 10.10.1.101
Remote IP/Netmask : 10.10.1.1/24

Click Next >
On the Policy & Routing page, use the following settings:
Local AS : 65400
Local interface : LAN
Local subnet. Click the +button to add more subnets:
Spoke type : Range
Spoke range prefix : 10.10.1.0/24
Spoke neighbor group : Branch-Peers

Click Next >
Click Create


Spoke ဘက်တွေကိုကျတော့ အလွယ်တကူ config ချလို့ရအောင် Configuration Key ကို Generate ထုတ်သွားရမယ်ဖြစ်ပါတယ်၊ နောက် Spoke sites တွေထပ်တိုးချင်ရင်လဲ ထပ်တိုးလို့ရပါတယ်၊

Configure VPN on FGT-Spoke1 with the IPsec Wizard:
On FGT-Spoke, navigate to VPN > IPsec Wizard.
On the VPN Setup page, use the following settings:
Name : Hub
Template type : Hub-and-Spoke
Role : Spoke
Easy Configuration Key : Spoke #1 ရဲ့ key ထည့်မယ်

Click Next >
On the Authentication page, use the following settings:
Pre-shared key : Labtest098&

Click Next >
On the Tunnel interface page, Click Next >

On the Policy & Routing page, use the following settings:
Local AS : 65400
Local interface : LAN
Local subnets : 192.168.111.0/24

Click Next >
Click Create


ထိုနည်း၎င်းအတိုင်းပဲ Spoke2 ကိုလဲ Spoke1 အတိုင်း config ထပ်လုပ်ရမယ်ဖြစ်ပါတယ်၊
ပြီးသွားရင်တော့ နောက်ဆုံး ကျွန်တော်တို့ Hub ဘက်မှာကော၊ Spoke1, Spoke2 ဘက်တွေမှာပါ VPN Tunnels တွေ up နေပြီဆိုတာ တွေ့ရမှာဖြစ်ပါတယ်၊


အချိန်ခဏနေကြာရင် Spoke to Spoke ကြား direct tunnels တွေထပ် up လာတာကိုတွေ့ရလိမ့်မယ်ဖြစ်ပါတယ်၊


Result အနေနဲ့ကတော့ အပေါ်က ပြောခဲ့သလို Auto Discovery VPN သည် Spoke sites တွေက topology ရဲ့ Hub ကို route မသွားတော့ပဲ Spoke တစ်ခုနဲ့တစ်ခု direct tunnel (dynamic)ကို အသုံးပြုသွားတာ တွေ့ရမှာဖြစ်ပါတယ်၊

Spoke1 ရဲ့ Local ကနေ Spoke2 ရဲ့ Local ကို တကယ်အလုပ်လုပ်မလုပ် testing လှမ်း ping ခြင်းဖြစ်ပါတယ်


Spoke1 ကနေ Spoke2ကို traffic route သွားတာတွေ့ရမှာဖြစ်ပါတယ်၊ ဒါပေမယ့် Hub ဆီကိုတော့ route သွားခြင်းမတွေ့ရပါဘူး၊ Spoke to Spoke direct tunnel အသုံးပြုသွားတာပဲ တွေ့ရမှာဖြစ်ပါတယ်၊ အားလုံးပဲ ကျွန်တော် Lab လေးကို အချိန်ပေးပြီး ဖတ်ရှုပေးတဲ့ ကျေးဇူးတင်ပါတယ် ခင်ဗျ၊ အမှားများပါခဲ့ရင်လဲ ကျွန်တော့်ကို လာရောက်ပြောပြပေးနိုင်ပါတယ်ခင်ဗျ။